Manual Transfer Switch Wiring Diagram Manual Overview
This manual transfer switch wiring diagram guide offers easy-to-follow instructions for safe and efficient installations. It unlocks the secrets of your new system, empowering precise control and understanding of power transfer between utility and backup generator sources for your electrical system.

Purpose of Transfer Switch Wiring Schematics
Transfer switch wiring schematics serve as indispensable guides, meticulously detailing the connections required to ensure a reliable and efficient power transfer between a primary utility source and a backup generator. Their fundamental purpose is to demystify complex electrical installations, providing clear, visual instructions that simplify the wiring process for both seasoned electricians and informed homeowners. These schematics employ a standardized language of symbols, where lines represent diverse wire types, and boxes or specific icons denote crucial components such as power sources, load connections, and circuit breakers. This visual clarity is paramount for understanding the flow of electricity and the interdependencies within the system. Furthermore, detailed diagrams offer step-by-step explanations for proper connections, identify key components, and often integrate critical safety tips. This comprehensive approach empowers users to make informed decisions regarding their electrical system, ensuring that the transfer switch is installed correctly to prevent dangerous backfeeding into the utility grid and guarantee the seamless, secure delivery of backup power to essential household circuits during an outage, maintaining household functionality and safety.
Understanding Manual Transfer Switch Operation
A manual transfer switch (MTS) is an essential component installed adjacent to a home’s main electrical service panel, designed to facilitate the safe and controlled transfer of power from the utility grid to a backup generator during an outage. Unlike automatic transfer switches, which autonomously detect power loss and initiate generator startup, a manual transfer switch requires direct human intervention. Its operation involves an operator physically changing the power source by manipulating a selector switch or lever. When utility power fails, the operator must manually start the backup generator and then, once the generator is stable, move the transfer switch to the “generator” position. This action isolates the home’s critical circuits from the grid and connects them to the generator, preventing hazardous backfeeding into the utility lines. Upon the return of utility power, the operator reverses the process: switching back to “utility” and then shutting down the generator. This operational sequence ensures a secure and deliberate transition, safeguarding both the household electrical system and utility workers by maintaining strict separation between power sources.
Key Wiring Diagram Components and Designations
Understanding a transfer switch wiring diagram involves recognizing key components like control wires (0, 194, 23), battery charger connections (00, T1), utility power lines (N1, N2), fuses, and optional load shedding contacts for safe, efficient power management.
Control Wires to the Generator
The control wires connecting the manual transfer switch to the generator are fundamental for its automatic functions, aligning with designations found on the generator itself. Designation 0 represents the 12-volt ground, essential for the SACM (System Automatic Control Module) electronics. Designation 194 carries 12-volt battery power directly from the generator’s battery, providing continuous power to the control circuitry. Designation 23 is the critical transfer signal wire; it becomes grounded when the generator’s internal control electronics detect a need for power transfer. This grounding action activates a relay within the SACM, which then applies 240 volts from the generator to the lower transfer coil, prompting the switch to move into the emergency power position. This specific control architecture is common with Generac generators, where the intelligence for starting and stopping resides within the generator. For other brands, which might house control logic in the transfer switch, an external electronics package with the necessary control logic may be required.
Designation 0: 12-Volt Ground
Designation 0 on the manual transfer switch wiring diagram signifies the 12-volt ground. This particular wire is a crucial component within the control circuitry, serving as the common return path for various low-voltage signals and power within the system. Its primary function is to provide a stable ground reference for the SACM (System Automatic Control Module) electronics, which are integral to the intelligent operation of the transfer switch and the generator. The SACM relies on this consistent ground connection to accurately process signals, monitor utility power, and initiate generator startup or shutdown commands. Without a proper and reliable 12-volt ground connection, the sophisticated control logic embedded in the generator—especially in systems designed to pair with brands like Generac—would not function correctly. This ground ensures the integrity of the low-voltage communication between the transfer switch and the generator, enabling the seamless detection of utility power outages and the subsequent activation of emergency power. It’s a foundational element for the entire control system’s stability and proper operation.
Designation 194: 12-Volt Battery from Generator
Designation 194 on the manual transfer switch wiring diagram identifies the 12-volt battery connection originating directly from the generator’s battery. This particular wire is a critical element among the control wires that link the transfer switch back to the generator. Its primary function is to provide a continuous 12-volt DC power supply, sourced from the generator’s own battery, to the control electronics and modules within the transfer switch. This steady power ensures that essential low-voltage components, including monitoring circuits and relays, remain energized, allowing the transfer switch to maintain communication with the generator. It’s instrumental for functions such as monitoring the generator’s readiness and supporting the control logic that orchestrates the power transfer. This dedicated 12-volt supply is especially important for systems where the generator’s control electronics manage the transfer process, matching the same designations found on the generator itself. Reliable power via Designation 194 is fundamental for the seamless and automated operation of the entire backup power system, enabling the transfer switch to accurately detect utility power status and command the generator.
Designation 23: Transfer Signal Wire
Designation 23, the transfer signal wire, plays a pivotal role in the automatic operation of the manual transfer switch system. This specific wire is part of the control wiring running back to the generator, synchronizing the switch’s actions with the generator’s operational status. When the control electronics within the generator detect a loss of utility power and the generator has successfully started and stabilized, a critical event occurs: Designation 23 is actively grounded. This grounding action serves as a direct command signal. It initiates the closure of a relay, typically within an associated System Automatic Control Module (SACM). The closure of this relay then applies 240 volts, sourced directly from the running generator, to the lower transfer coil of the switch mechanism. This voltage energization physically moves the transfer switch into the emergency power position, effectively connecting the generator’s output to the critical household circuits. Conversely, when utility power is restored and detected by the generator’s control logic, the ground on wire 23 is removed, signaling the transfer switch to revert to the utility power source; This intricate signaling ensures a reliable and responsive transition during power outages.
Designation 00: Neutral for Battery Charger
Designation 00 represents the dedicated neutral, or return, wire specifically intended for the battery charger located within the generator. This connection is fundamental for the proper operation of the generator’s internal battery charging system. The battery charger requires a complete circuit, and Designation 00 provides the essential return path for the 120VAC power supplied via Designation T1. This ensures that the generator’s starting battery remains adequately charged, guaranteeing the generator’s readiness to start automatically when utility power is lost. It is noteworthy that this specific “00” neutral for the battery charger is a relatively recent development in wiring schemes. Historically, older generator wiring configurations often routed the battery charger’s neutral connection directly to the main neutral within the generator itself. The introduction of a distinct Designation 00 offers a more isolated and potentially more robust connection for the charging circuit, simplifying troubleshooting and improving overall system integrity. Correctly wiring Designation 00 is critical for maintaining the generator’s operational reliability and ensuring its ability to respond promptly during an outage.

Designation T1: 120VAC for Battery Charger
Designation T1 is crucial for providing 120VAC power directly to the battery charger integrated within the generator. This alternating current supply is essential for keeping the generator’s starting battery fully charged and ready for immediate operation. Without a consistent power feed through T1, the generator’s battery would eventually discharge, hindering its ability to start automatically when a power outage occurs. This wire, along with N1 and N2, handles low current and is safeguarded by dedicated fuses located below the connections in the transfer switch. When replacing these fuses, it is important to exercise caution, as the fuse clips can be delicate and prone to damage. The 120VAC supplied by T1 works in conjunction with Designation 00, which serves as the neutral return for the battery charger circuit. This modern wiring scheme ensures a stable and isolated power source for the charger. It is imperative to use high-voltage rated wire for T1, avoiding less robust options like thermostat wire, to ensure safety and compliance. Proper connection of T1 guarantees the generator’s readiness to transfer power efficiently.
Utility Power Wires N1 and N2
Designations N1 and N2 are fundamental, carrying the 240VAC utility power directly to the transfer switch. The generator’s control electronics continuously monitor this incoming voltage, serving as the primary detection mechanism for grid stability. Should the utility power drop below a preset value, unambiguously indicating an outage, the generator’s system automatically initiates its startup sequence. Once the generator achieves stable operation and is prepared to supply power, it grounds wire 23. This critical signal prompts the transfer switch to engage, moving to the emergency power position and thereby supplying essential backup power. Conversely, when stable utility power is restored, the ground signal on wire 23 is promptly removed, allowing the transfer switch to seamlessly revert to the main utility source; N1 and N2, along with T1, are low-current circuits, protected by three dedicated fuses within the switch. Caution is advised during fuse replacement due to fragile clips. It is imperative to use only high-voltage rated wire for these connections; thermostat wire is strictly prohibited. Generac frequently offers specialized tray cables, bundling these power and control wires into a single protective jacket, greatly simplifying installation while ensuring robust, reliable power monitoring and efficient transfer functionality for the entire system.
Fuses for Low Current Wires
The low current wires, specifically N1, N2, and T1, are vital components within the transfer switch’s control system, and their integrity is safeguarded by dedicated fuses. These three fuses are strategically placed to protect the sensitive electronics and circuits responsible for monitoring utility power and facilitating the generator’s battery charging functions. N1 and N2 monitor the 240VAC utility power, essential for detecting outages, while T1 provides 120VAC to power the generator’s battery charger. Given the low current nature of these specific circuits, the fuses act as a critical line of defense against overcurrent conditions, preventing potential damage to the control logic within the generator or the transfer switch itself. It is imperative to exercise extreme caution when performing any maintenance involving these fuses, particularly during their replacement. The fuse clips are noted for their fragility, making careful handling crucial to avoid breakage, which could compromise the connection and lead to operational issues. These protective elements are indispensable for the reliable and safe functioning of the transfer switch’s control mechanisms, ensuring precise power management.
Optional Contacts for Load Shedding

Many manual transfer switches incorporate optional contacts specifically designed for load shedding, a crucial feature for optimizing generator performance and preventing overload. These “upper wires,” as they are sometimes referred to, serve as an intelligent mechanism to temporarily disconnect non-essential, high-power loads when the generator is operating under heavy demand. Their primary function is to interrupt devices like thermostats for high-power air conditioners or car chargers, which can draw significant current and potentially exceed the generator’s capacity. By shedding these loads, the system ensures that critical circuits remain powered without straining the generator. This capability is particularly valuable during extended outages or when multiple high-demand appliances might otherwise run simultaneously. The integration of such contacts allows for a more efficient allocation of available generator power, prolonging the generator’s lifespan and ensuring stable operation. These optional contacts provide a flexible solution for managing diverse household electrical demands, contributing significantly to the reliability and safety of your backup power system during emergency situations.
Wiring Diagram Installation Steps and Considerations
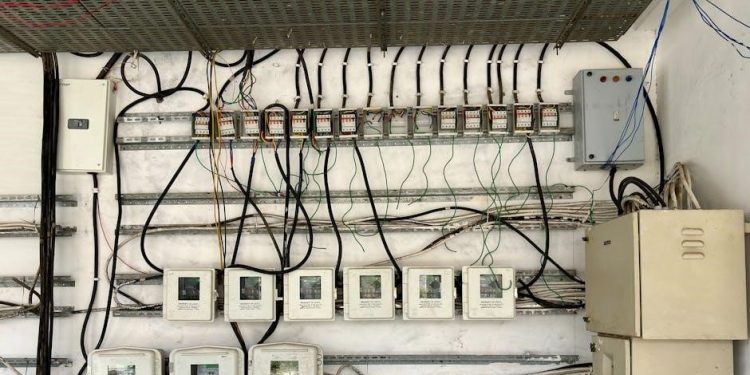
Installation involves turning off main power, identifying critical household circuits, and matching them to the transfer switch. Connect ground and neutral wires to appropriate bus bars. Use high voltage-rated wire, not thermostat wire, often bundled in tray cable for simpler, safe, and correct wiring.
Determining Critical Household Circuits
Determining critical household circuits is a fundamental initial step when installing a manual transfer switch for a backup generator. This crucial phase involves carefully identifying which essential loads within your home require continuous power during an outage. Typically, this selection focuses on necessities that maintain comfort, safety, and prevent economic loss. Common examples include the refrigerator and freezer to preserve perishable food, the furnace or air conditioning for climate control, and at least one lighting circuit for visibility. Additionally, a small appliance circuit for charging devices or operating essential electronics is often prioritized. The goal is to ensure that when utility power fails, your generator can adequately supply the most vital functions without being overloaded. You will then match these selected critical circuits with the corresponding circuit inlets on your pre-wired transfer switch, ensuring a seamless and efficient power transition. This thoughtful planning prevents unnecessary consumption, optimizing generator fuel usage and extending runtime during emergency situations, providing peace of mind.

Connecting Ground and Neutral Wires
Connecting ground and neutral wires correctly is paramount for safety and proper transfer switch operation. When installing a manual transfer switch, you must connect these conductors to their designated bus bars within both the transfer switch and the main service panel. For instance, the armored cable running between the transfer switch and the main panel will house these critical conductors. The neutral wire from the generator can often run directly to the transfer switch and then to the main panel without requiring a switch, provided the generator’s neutral-ground bond is removed if it operates as a separately derived system. It is vital to confirm that the ground bar is bonded to the metal of the transfer switch box or the main panel; if not, a ground lug must be installed. Older wiring schemes might have tied the generator’s battery charger to the main neutral, while newer designs use a dedicated ’00’ neutral for the charger. Remember, a 240-volt-only device might not require a neutral connection at the transfer switch, though connecting it to a neutral terminal (if present) is permissible, even if unused. Always ensure proper bonding at the generator as well.
Required Wire Types for Transfer Switches
Selecting the appropriate wire types is crucial for the safe and reliable operation of any manual transfer switch. Only high voltage rated wire must be used for all system connections. Low-voltage thermostat wire is strictly prohibited, as it simply cannot handle the higher electrical loads or voltages involved in power transfer systems. Using incorrect wiring poses significant safety risks, including overheating, fire hazards, and potential system failures, while also violating electrical codes. For robust installations, especially for the conduit runs between the transfer switch and the main electrical panel, armored cable is highly recommended. This cable provides essential physical protection for the conductors and ensures proper grounding continuity. Furthermore, manufacturers like Generac often offer specialized solutions such as tray cable. This convenient cable type bundles all necessary power and control wires within a single protective jacket, significantly streamlining the installation process and contributing to a neat, organized setup. While connections for utility power monitoring (N1, N2) and the generator battery charger (T1) carry lower current and are fuse-protected, the primary requirement for high voltage rated wiring applies universally throughout the entire transfer switch system to ensure optimal safety and full compliance.

Safety and Professional Installation Guidance
Always prioritize safety in electrical work. It is paramount to engage a qualified electrician for any transfer switch installation or maintenance. This ensures correct wiring, code compliance, and prevents dangerous situations effectively.
Importance of a Qualified Electrician
It is always best to get a qualified electrician to perform any electrical work, especially concerning a manual transfer switch installation; Electrical tasks carry significant risks; improper handling can lead to severe hazards like electrocution, fire, and property damage. The complexity of integrating a transfer switch into your electrical system demands a comprehensive understanding of codes, safety standards, and precise wiring configurations, which only a certified professional possesses. Relying on unverified advice or attempting DIY solutions without proper credentials is extremely dangerous. A qualified electrician ensures the installation complies strictly with all local and national electrical regulations. They guarantee the utmost safety and reliability of your power transfer system. Professionals correctly identify critical circuits, properly connect ground and neutral wires, and use required wire types. Their expertise minimizes risks, ensures functionality, and provides crucial peace of mind. This community emphasizes caution; users are not responsible for any electrical work performed.